Prepare a 7.5 ml of 3% stacking gel in a small beaker using the following amounts of appropriate reagents.
| Stock | final conc. | Amount to use |
| 0.5 M Tris-HCl | 0.125M | 1.88 ml |
| 10 % Acryl:Bis* | 3% | 2.25 ml |
| 10% SDS | 0.1% | 0.075 ml |
| 10% APS | 0.1% | 0.10 ml |
| H2O | 3.19 ml | |
| TEMED | 0.00067% | 10 µl |
3. When the polymerization of resolving gel is complete, decant the layer of water. Dry excess water using Kim-wipes.
4. Pour the stacking gel using a pasture pipette. Insert the comb gently. Leave to polymerize until gel turns milky (at least 30 min.).
Note: To insure a leakproof seal, make sure the gray U-shaped inner cooling core gaskets are clean. Inspect the gasket for small cuts that could result in an upper buffer leak. There are two sides to this gasket. Make sure that the side with the notch is exposed for contact with the gel sandwich.
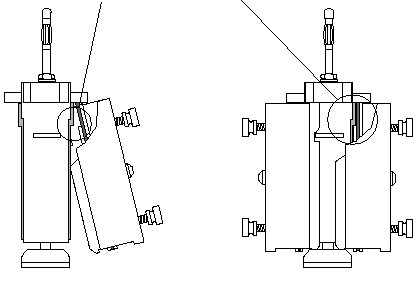
1. Release the clamp assemblies/gel sandwiches from the casting stand.
2. Lay the inner cooling core down flat on a lab bench. With the glass plates of the gel sandwich facing the cooling core (and the clamp screws facing out), carefully slide the clamp assembly wedges underneath the locator slots on the inner cooling core until the inner glass plate of the gel sandwich butts up against the notch in the U-shaped gasket (Figure 5.1).
Note: Lubricating the raised portions of the U-shaped gasket with a drop of running buffer or water helps the glass plate sandwich slide in properly.
While pushing the clamp assembly slightly up toward the top of the locator slots, snap the clamp assembly fully onto the cooling core by pressing at the bottom of the clamp assembly until the cooling core latch engages each side of the clamp assembly. (Do not pull out on cooling core latch at the same time.)
1. Remove the 10 dialyzed fractions collected after the density gradient centrifugation and the pooled lipophorin sample from the cold room. Remove 50 µl each and place into a pre-labeled Eppendorf tubes. Label the tube at the lid with a waterproof pen; otherwise you won't be able to identify your samples!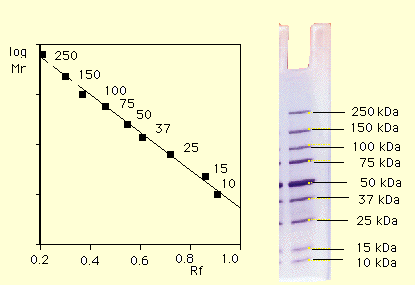
2. Add 25 µl sample buffer to each fraction and close lids. Together with one tube of molecular weight markers, place in the sample holder and boil for 2 min.
Use the following molecular weights:
3. In the meantime, remove the comb from the gel. Mark the wells with a felt pen. This will enable you to see the wells clearly when the running buffer is poured into the upper chamber. Assemble the upper buffer chamber.
5. Dilute 60 ml of 5x stock of running buffer with 240 ml of dist. water. Pour carefully into the upper buffer chamber until the wells are covered. Pour the rest of the buffer into lower buffer chamber along the walls of the container. Make sure no air bubbles are trapped under the gels. If present, you can remove air bubbles using a wire bent at the tip.
6. Have two standard molecular weight markers (high and low range) ready. It is not necessary to add sample buffer to the molecular weight markers since it has already been added. These should be loaded into the two corner wells.
7. Using a clean Hamilton syringe load the samples in to the wells. Load 10 µl of each sample. For the pooled lipophorin sample, load three different amounts to assure a good banding pattern for densitomentric analysis: e.g., 2 µl, 5 µl, 15 µl. Rinse the syringe well with dist. water after each sample.
8. Place the cover and attach the power supply. Turn on the power and set run voltage to 125 volts. Approximate run time is about 1 h.
9. while the the gel is running, drop the tube with the lipophorin in liquid nitrogen.
10. Place a parafilm on top of the tube and pierce the film with a needle.
11. Leave in a lyophilizer jar and attach to the lyophilizer.
12. Freeze dry (lyophilize) overnight or longer.
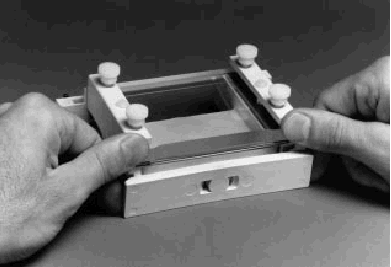
13. Once the electrophoresis run is complete (when the marker dye reaches approximately 1 cm from the bottom of the gel), turn the power off. Remove the gels from the upper buffer chamber. Lay the inner cooling core on its side and remove the clamp assembly by pushing down on both sides of the cooling core latch and up on the clamps until the clamp assembly is released. Slide the clamp assembly away from the cooling core. Open the scres and remove the gel sandwich.
14. Prop open the glass plate. Remove the gel carefully and leave in the stain. Stain overnight.
1. Decant used stain into the bottle assigned. Pour destain and leave on shaker for 2-3 h or until bands are visible in a lighter background.
安捷伦科技(纽交所代码:A)3月8日宣布,它已签署了一项最终协议,以2.5亿美元现金收购私人持有的先进分析技术公司(AdvancedAnalyticalTechnologies,Inc.简称:AATI......
带电物质在电场中向其所带电荷相反的电极移动的现象称电泳。电泳分离生物大分子的原理: 由于混合物中各组分所带电荷性质、电荷数量以及分子量的不同,在同一电场的作用下,它们泳动的方向和速度也不同。......
【概述】带电颗粒在电场作用下,向着与其电性相反的电极移动,称为电泳(electrophoresis,EP)。利用带电粒子在电场中移动速度不同而达到分离的技术称为电泳技术。1807年,由俄国莫斯科大学的......